
These cherry scones have a tender crumb that melts in the mouth and a crispy and sugary exterior. The cherries’ flavor and natural sweetness are intensified once baked, but the pieces of fruit remain plump and juicy! Cherry scones encapsulate summertime in one delicious bite.

Making scones is actually super easy! It’s pretty rare for me to bake anything that requires only half an hour of hands-on time. I’m a really slow baker, I take my time, I enjoy the process, I get slightly distracted by my podcasts… I was pretty impressed when I noticed that, from start to finish, it only takes me 30 min to get the scones ready for the oven!
Ultimate breakfast treat
Ever since I started drinking coffee a couple of years ago, I’ve become way more interested in ‘morning treats’. I wanted to taste everything that I could picture displayed at a coffee shop counter. I’ve had a donut phase, a granola phase, a Swedish pastries phase, and I even tried my hand at making croissants! And now I have finally entered into a scones phase! Technically, I don’t eat breakfast, but freshly baked goods make for great elevenses and numerous coffee breaks during the day.
❗ Disclaimer: This is a recipe for American-style scones, not British/Irish ones. These cherry scones have a much higher percentage of butter and sugar. They are bordering on dessert because they are eaten ‘plain’. If you want to eat the cherry scones with jam, I would recommend reducing the amount of sugar a bit.
🍒 Frozen cherries
You can make these cherry scones with frozen pitted sweet cherries as long as you thaw them first.
⇨ Put the cherries on a plate in a single layer, cover with plastic wrap and let the cherries sit overnight in the fridge.
⇨ If you are short on time, put the cherries into a bowl and cover them with cold water. Let them sit in the cold water bath until completely defrosted, then drain in a colander. It should take about 15 min for the biggest cherries.
Once thawed, you can then start the recipe as it’s written in the recipe card.

💭 Success tips
Scones are nonexistent in France and for someone who has been baking for 20 years, weirdly intimidating to me. They are just so small and dainty and they always look picture-perfect online! Besides, I had made a couple of disastrous batches of savory scones in the past. They had turned up flat and dry, and they had put me off scones for a while. But after finally deep-diving into the matter, I found out that my wedges were simply too flat and that I was over-kneading the dough.
I actually picked out a few useful tips in my research for foolproof, crumbly, flavorful scones! Follow these simple rules and your scones will turn up perfect every time!
- Use fridge-cold ingredients: The butter needs to be cold so that the little pieces of shredded butter will remain firm until the scones are placed in the oven. While baking, the butter pieces will release steam, which will yield an airy crumb. Using cold egg and cream also helps to keep the dough cold and prevents the butter from softening.
- Don’t overwork the dough: Be moderate, be gentle, only mix the dough until it just comes together. The goal here is to bring the ingredients together rather than to actually knead the dough. The dough will look a bit shaggy and crumbly with a few lumps in it, and that’s perfectly normal. If you overmix your dough and over-handle it while shaping, the cherry scones will turn out tough and flat. Do not aim for a perfectly soft, tight dough. This was definitely my pitfall with scones in the past.
- Chill the shaped scones while the oven preheats: As stated above, the butter in the dough needs to remain intact before baking to ensure a tender crumb. Unfortunately, you automatically end up warming the dough with your hands while folding and shaping the scones. Because of this, I like to place my cherry scones in the freezer once shaped, while the oven preheats, to firm up the butter again. Chilling the cherry scones a bit before baking will also prevent them from spreading too much in the oven. Plus, the gluten in the flour will have time to relax, which also helps with the rise! If you don’t have a freezer, leave the shaped scones in the fridge for 30 min.
📋 Step by step
This is an overview with step-by-step photos. The ingredient list and full instructions are in the recipe card below.
Step 1: Make the dough
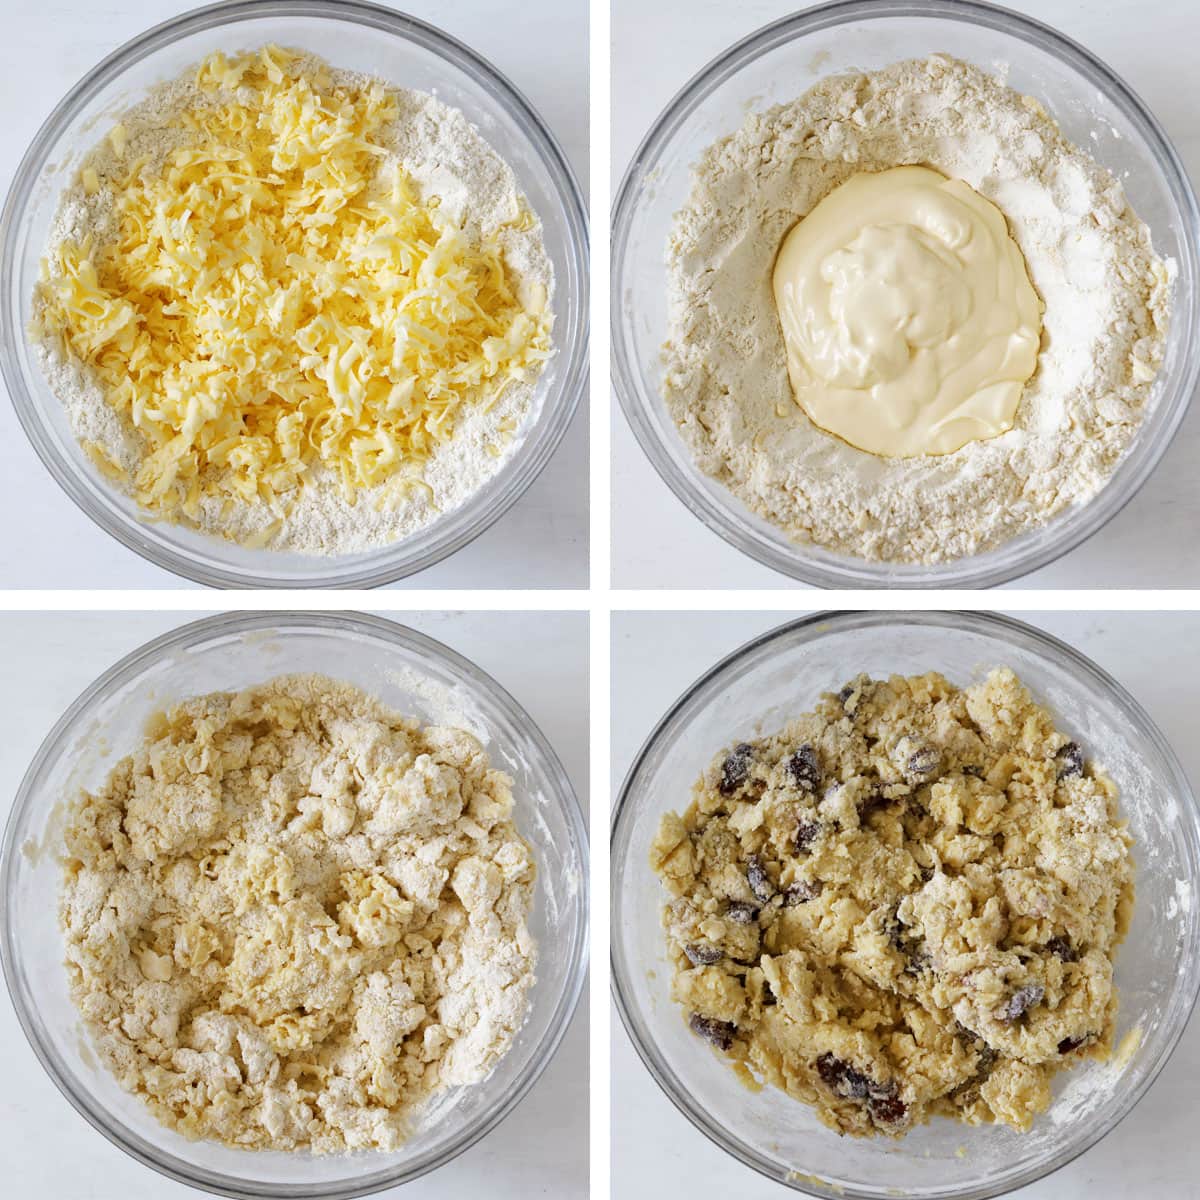
Beat the egg in a medium bowl and whisk in the cream and extract. Combine the dry ingredients in a separate large mixing bowl. Add the cold, grated butter to the dry ingredients. Toss the pieces of butter in the flour to coat them. Make a well in the center. Drizzle the wet ingredients into the flour mixture, tossing until almost everything appears hydrated. Gently fold the cherries into the dough.
Step 2: Shape!

Pat and press the dough on a lightly floured surface into a 4 cm (1 ½-inch) thick disc that is about 15 cm (6-inch) wide. Brush the surface of the dough with egg wash. Sprinkle sugar over the top, followed by the almonds and some more sugar. Cut the dough into 8 wedges and transfer them to a lined baking sheet. Chill the cherry scones while you preheat the oven, and then bake!
❄️ How to freeze
Scones are best eaten on the day they are made, so if you want to preserve them at their utmost freshness, freezing is the best option. You can freeze the cherry scones:
- baked: Once baked and fully cooled, place them on a baking sheet lined with parchment paper. Freeze them until solid and then wrap each scone in plastic wrap and then aluminum foil, and place them into a freezer bag. You can keep baked cherry scones in the freezer for up to 2 months. Thaw them at room temperature.
- unbaked: I think frozen cherry scones are at their best if you freeze them unbaked and then bake them the day you want to serve them.
Once shaped, glazed and sprinkled with almond flakes and sugar, put the cherry scones on a parchment-lined baking sheet. Freeze them until solid; it should take about 1h. Then individually wrap them in plastic wrap and then aluminum foil, and pack them airtight in a freezer bag. You can keep unbaked cherry scones for up to 1 month.
When you want to bake them, arrange them on a baking sheet lined with parchment paper. Let them sit at room temperature while you preheat the oven to 200°C (390°F) for 15 min. Slide the sheet into the oven, and add a couple more minutes of baking time to the one written in the recipe.

Cherry scones
- Prep Time: 35 minutes
- resting: 15 minutes
- Cook Time: 25 minutes
- Total Time: 1 hour 15 minutes
- Yield: 8 scones 1x
- Category: Breakfast
- Method: Oven
- Cuisine: American
Description
These cherry scones have a tender crumb that melts in the mouth and a crispy and sugary exterior. The cherries’ flavor and natural sweetness are intensified once baked but the pieces of fruits remain plump and juicy!
Ingredients
For the dough:
- 115 g butter, fridge-cold (1 stick)
- 210 g cherries (1 ½ cups)
- 375 g all-purpose flour (2 ⅔ cups)
- 11 g baking powder (1 tbsp)
- ½ tsp fine sea salt
- 100 g granulated sugar (½ cup), or use caster sugar
- 1 egg, fridge-cold
- 180 ml heavy cream, fridge-cold (¾ cup)
- 2 tsp almond extract, or use vanilla extract
For the topping:
- 2 tsp granulated sugar, divided
- 4 tbsp flaked or sliced almonds
Instructions
- Prepare the butter and the cherries. Grate the butter using the largest circular shredding holes of a box grater. Quickly place the grated butter on a plate and put it in the freezer (or the fridge if you don’t have a freezer). The butter needs to be really cold and firm before making the dough. Pit the cherries and roughly chop them. Place them on a plate lined with paper towels and cover them with another layer of paper towels. The goal is to absorb as much juice as possible so that the cherries won’t bleed too much while being incorporated into the dough.
- Make the dough. Place the flour, baking powder, salt and sugar in a large mixing bowl. Whisk to combine. Beat the egg in a separate medium bowl. Pour 2 tbsp of the beaten egg into a small cup and set it aside. You’ll use that to glaze the scone. Add the cream and almond extract (if using) to the medium-sized bowl containing most of the beaten egg. Whisk the wet ingredients together until combined. Add the grated butter to the dry ingredients in the mixing bowl. Use a knife to scrape the plate if some of the shredded bits of butter are stuck. Use your hands to toss the pieces of butter around, break them apart and coat them with flour. Make a well in the center of the flour mixture. Slowly drizzle the wet ingredients into the flour mixture, tossing with the blade of a knife until almost everything appears hydrated. There should still be some dry spots. Add the chopped cherries and fold them into the dough with a rubber spatula. Don’t overwork the dough; otherwise the scones might turn out tough. Fold until the dough begins to come together and the cherries are evenly distributed throughout. If the dough is too dry and does not come together, add 1 to 2 more tbsp of cream.
- Shape the scones. Turn out the dough on a lightly floured surface and flour the top. Pat and press the dough into a 4 cm (1 ½-inch) thick disc that is about 15 cm (6-inch) wide. If the dough is too sticky, flour your hands and the surface lightly as you work. Brush the surface of the dough with the egg wash you prepared earlier. Sprinkle 1 tsp of sugar over the top, followed by the almonds and then the remaining 1 tsp of sugar. Using a knife or a bench scraper, cut with sharp up-and-down movements into 8 wedges. Line a baking sheet with parchment paper. Transfer the scones, one by one, to the sheet using a spatula, spacing them evenly.
- Bake. Place the sheet in the freezer for 15 min (if you don’t have a freezer, put it in the refrigerator for 30 min). In the meantime, preheat the oven to 200°C (390°F). Bake the scones until lightly browned on top and the bottoms are golden brown, about 25 min. Remove from the oven and let the cherry scones cool down on the baking sheet for a few minutes. Serve just warm or at room temperature.
Notes
Cherry scones are best on the day they are made. If you have leftovers, cover them and keep at room temperature for up to 2 days. They will soften over time. Rewarm slightly in a 175°C (300°F) oven before serving.
You can swap the cherries for any other fruit you have on hand. For example, you could use the same amount of banana or peach cut into small chunks, cubed apple or pear, whole blueberries or raspberries, roughly chopped stoned apricots, or strawberries. Once you’ve sliced/chopped/cut up your desired fruits, put them on a plate lined with paper towels and cover them with another layer of paper towels. It’s important to absorb as much juice as possible so that they won’t bleed too much while being folded into the dough.
Nutrition
- Serving Size: 1
- Calories: 459
Do you want to bake something else for breakfast? Here are some of my favorite recipes:


Leave a Reply