
Homemade chocolate ice cream is easy to make and the results are well worth the effort, but you will need a machine to churn the ice cream. This ice cream is really good though! Like I-need-to-make-another-tube-as-soon-as-this-one-is-done good.

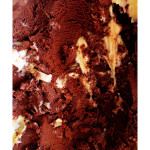
This ice cream is super creamy with a dense chocolate taste and as soon as you hit the fudge swirls you’re in white chocolate heaven.
Jump to:
🕑 Make ahead
I usually prepare the chocolate custard and the white chocolate fudge the day before I plan to eat the homemade chocolate ice cream. I love it when I can do all the hard work the day before. It takes a lot of pressure off. On the morning of the day you are planning to eat your homemade chocolate ice cream you can just pop the custard in your machine, layer the ice cream with the fudge, freeze it and voila. 4 hours later you can dig in.
💭 Top tips
Making homemade chocolate ice cream from scratch can be daunting, so here are my top tips:
- use a heavy-based saucepan: Your custard will cook more evenly and will avoid burning. Once, I was too lazy to clean my only heavy-based saucepan to cook the custard in and I used a very cheap thin one. Needless to say, my custard got too hot too quickly and almost turned into scrambled eggs.
- always cook your custard over low heat: This helps to slowly cook the yolks in the custard, thus thickening it to the perfect consistency. Over high heat, there is a risk that the yolks will cook too quickly and you might end up with scrambled eggs.
- wait for everything to be cold before layering: Once I did the fudge right before churning the ice cream. The fudge didn’t have time to cool down before I layered it with the ice cream. Hahaha hot sauce on cold ice cream => huge mistake. The fudge instantly solidified when it touched the ice cream, which gave me homemade chocolate ice cream with big chunks of gritty white chocolate pieces instead of white chocolate fudge swirls. It wasn’t terrible but it wasn’t good either.
- use a machine to churn the ice cream: There are ways you can churn ice cream by hand but they are usually very time-consuming. An ice cream maker will help aerate the custard by churning it. You’ll end up with creamier ice cream. I have been using a cheap one (less than 40€) and it really does the job. The only con of a ‘cheap’ machine is that after churning the homemade chocolate ice cream you will have to wait for a few hours for it to freeze. An expensive ice cream maker comes with a compressor that freezes the ice cream while it churns it.

Cones decoration
How to decorate ice cream cones: Melt pieces of chocolate in a large heatproof bowl on top of a pan of simmering water. The water shouldn’t touch the base of the pan. Stir from time to time until the chocolate has melted and take off the heat. With a spoon drizzle chocolate around the cones and put some sprinkles on it. Place your cones in glasses so that they are standing up, but be careful that the chocolate doesn’t touch the rim of the glass. Wait for the chocolate to set before using the cones.
If it’s a very hot summer day I usually put mine in the fridge to accelerate the process (be careful that the chocolate doesn’t touch anything) but it does change the texture of the cones a bit.
Homemade chocolate ice cream with machine
- Prep Time: 50 minutes
- freezing: 4 hours
- Cook Time: 20 minutes
- Total Time: 5 hour 10 minutes
- Yield: 1 ½ pints 1x
- Category: Ice cream
- Method: Ice cream maker
- Cuisine: French
- Diet: Vegetarian
Description
This ice cream is super creamy, chocolatey and when you hit the fudge swirls it’s white chocolate heaven! Homemade chocolate ice cream is easy to make and the results are well worth the effort, as long as you have a machine to churn the ice cream.
Ingredients
For the white chocolate fudge:
-
40g corn syrup or golden syrup (or honey if not available where you live) (2 tbsp)
-
80ml heavy cream (⅓ cup)
-
15g butter (1 tbsp)
-
pinch of fine sea salt
-
115g baking white chocolate (4 oz)
-
½ tsp vanilla extract
For the chocolate ice cream:
-
150g bittersweet baking chocolate (70% cacao) (5 oz), roughly chopped
-
4 tbsp unsweetened cocoa powder
-
½ tsp vanilla extract
-
75ml brewed coffee (⅓ cup)
-
150ml + 250ml heavy cream (⅔ cup + 1 cup)
-
250ml whole milk (1 cup)
-
100g granulated sugar (½ cup)
-
¼ tsp fine sea salt
-
4 egg yolks
Instructions
Keep in mind that the ice cream maker bowl needs to be placed in the freezer for at least 24 hours before using it to churn the ice cream.
For the white chocolate fudge:

-
Make the white chocolate fudge. Put the syrup, heavy cream, butter and salt in a medium heavy-based saucepan over low heat. Stir from time to time for 5 min with a silicone spatula until everything has melted and is combined. Take the saucepan off the heat and add the chocolate and vanilla extract. Stir until the chocolate has melted and is completely smooth.
-
Store. Scrape the fudge into a bowl, cover the bowl tightly with plastic wrap and let it stand until the fudge is at room temperature. Then place in the fridge until you’ll need it for the ice cream, preferably the day after.
For the chocolate ice cream:
-
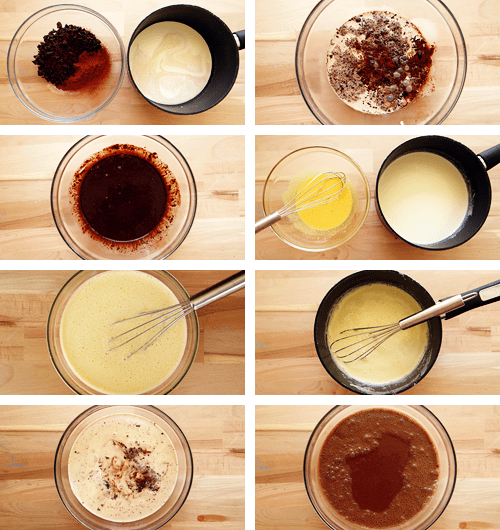
Melt the chocolate and make the custard. In a large bowl, combine the chopped chocolate, cocoa powder and vanilla extract. In a medium heavy-based saucepan over medium heat, bring the coffee and 150ml (⅔ cup) of cream to just below a boil, stirring frequently. Pour the hot liquid over the chocolate and stir until completely smooth. Set a mesh strainer over this large bowl. In the same saucepan over medium heat, bring the 250ml (1 cup) of cream left, milk, sugar and salt to just below a boil, stirring frequently to make sure the sugar has dissolved. In a separate medium bowl whisk the yolks for 2 minutes, until they lighten. Slowly pour the hot milk/cream mixture into the yolk bowl while whisking constantly.
-
Cook the custard. Pour the egg mixture back into the saucepan and place it over low heat, stirring constantly with a spatula and scraping the bottom of the pan as you stir. If it’s too hot, the custard will curdle so be careful. Cook and stir it for 5 min until the custard thickens and coats the spatula or until the custard’s temperature reaches 80°C (176°F).
-
Pour the custard over the melted chocolate. Pour the custard through the mesh strainer into the melted chocolate bowl and whisk until smooth. Cover the bowl with plastic wrap, pressing it directly onto the surface of the chocolate custard and let stand until it’s at room temperature.
-
Churn the ice cream. Chill the custard thoroughly in the fridge for at least 8 hours but preferably overnight. Whisk the chilled custard until smooth and scrape it into your ice cream maker. Churn according to the manufacturer’s instructions.
To assemble:

-
Layer up! Scrap one-third of the ice cream in a medium-sized container with a tight-fitting lid and spread it evenly. Spoon one-third of the white chocolate fudge randomly over the ice cream. Repeat layering until you run out of ice cream and fudge, ending with the fudge. Run the blade of a small knife through the layers in a zig-zag motion to create a swirl pattern.
-
Freeze. Cover the ice cream with plastic wrap, pressing it directly onto the surface of your homemade chocolate ice cream. Close the lid and freeze for at least 4 hours or overnight.
Notes
Make sure to let the container sit at room temperature for 10 min before scooping, and directly put the homemade chocolate ice cream back in the freezer after serving.
Storage: you can technically keep your ice cream in the freezer for a couple of months but the texture and taste may change. The homemade chocolate ice cream might become icy due to ice crystals and the flavor might water down. I would advise you to eat it fast, or at least within 2 weeks.
Nutrition
- Serving Size: 2 scoops
- Calories: 531
Looking for other ice cream recipes? Here are some of my favorites:


Leave a Reply